Thursday 4 December 2014

Timed Hair Assessment

Monday 24th November- Hair Designer: Me, Hair stylist: Beth-


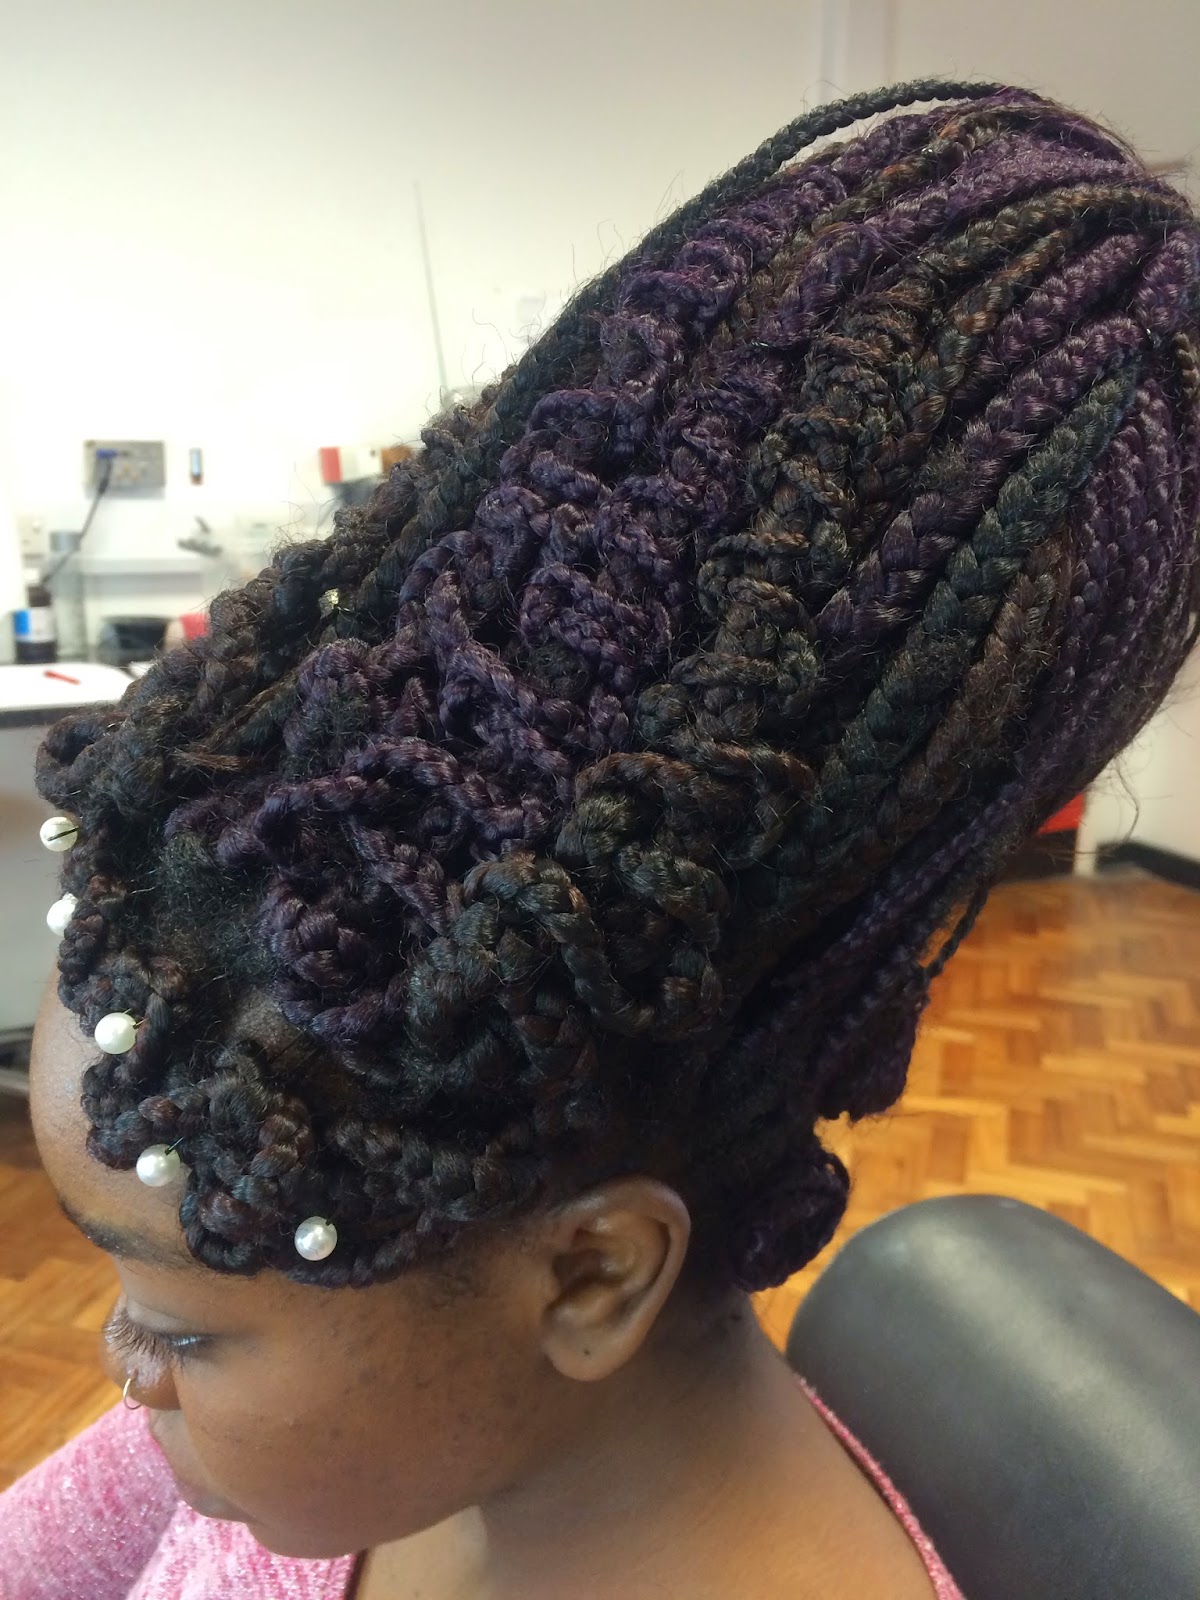
This was the final design that Beth created on me. We have been working on this design and developing it over the past through weeks, I gathered inspiration from designers and artists to create this final design. On the day of the assessment Beth set up her work station and I brought along my drawing of the final design a mood board of photos, step by step instructions and equipment list. I also brought with me the padding to create the heart shape beehive and the pearls to go in the hair.

 Once we set up and was ready Beth started on the hair design. Before hand we were aloud to come in and prep the hair to save time on creating the design as we had a certain amount of time to complete this design. Beth crimped my whole head before hand which took around 40 minutes to do, this definitely saved time and let Beth concentrated on the rest of the hair design.  Once starting on the hair she starting with all the braiding first and then moved onto the heart beehive, the bun and then the placement of the pearls. Overall Beth did an amazing job at completing my design, in the timed assessment she completed it in just over an hour. Lesson Before the assessment Beth practised this design in many ways trying different ways to create it and finding her best way to create it. When I threw the design at Beth she immediately looked at the design and created it beautifully from then onward she practised to perfect the design. I feel Beth worked to my design wonderfully and completed to hair design to high standards, the hair design was neat, very secure, tidy and even throughout the whole design. Previous feedback Beth received creating the design was to work on tidying up the plaits and making sure each side on the middle of the beehive was symmetrical. Beth practised it one more time and got it spot on, I'm very happy with my design and it was a pleasure working with Beth. I felt we worked well together because we listened to each others ideas, helped and gave each other fair feedback and we both attended every lesson. 


Front
Back
Bottom back
My hair design drawing
My Hair Mood board


Monday 1st December- Hair stylist: Me, Hair Designer: Beth 


This was my final design that I created on my partner. My partner Beth on the day brought a drawing of what the design should look like and a step to step guide of how to create the hair design. Prior to this lesson me and Beth worked together for a few weeks getting familiar with each others hair and practising our design. We developed our designs together so this gave us a great understanding of each others design and I was able to practise the techniques as we developed along. Working with Beth was a pleasure as she always came to every lesson like I did so we never missed any practical sessions and was happy to stay behind together and work on each others designs. I've averagely practised this design around 3-4 however during the process we would add in new techniques and I feel I would improve each time. Last week I created the full hair design however I created it in around 1 hour and 35 minutes, I felt like I needed to cut down on the timing a little more by around 15 minutes. Everything in my practise session went to plan except I needed to speed up the design if everything was going to fit in. 


On the day of the assessment I was confident with creating the design however I was worrying about the timing as I hoping everything would go to plan and not slow down the design. The fact also that I couldn't prep any of the hair was a little frustrating as my whole design had to be completed in lesson time as other got to get a head start on there design. When I arrived to lesson the starting time was 3 pm, I was completely set up and ready to create the design by 3.10 pm, I started off with creating the beehive which normally takes me around 50 minutes to complete however in the assessment it only took me 40 minutes to finish the beehive which was the main timing issue. The rest of the design took me through until 4.30 pm and then I took my photos between 4.30-4.45 and we had 15 minutes to take the hair design out and pack away. Overall timing went perfectly to plan as I was very happy with the time I achieved for such an elaborate design. I feel I worked to Beths design plan well as we adapted our ideas together and always tried to help and improve each others design I feel this is how we made a strong team by criticising each others work and developing our ideas together. On the day all I needed to bring was the padding, Beth brought in her design and instructions of how to create the hair, black pins (all sizes) and the pearls which I previously gave her in the Practise session. Overall I'm extremely happy with how the design came out and I'm so pleased with what Iv'e achieved throughout the hair lesson I feel I really developed in my skills and timing of creating a full hair design. 


Front
Back
Side
Beths Instructions for the assessment
Beths drawn hair design 
Front drawing of the hair design

Designer Hairstyle

We've been told we have to create a hairstyle for a new up and coming hair designer. This will be worn by the models in the winter collection catwalk show. The designer has told us that the collection has some bold patterns and colours. They would like the hair to be big and bold to compliment the clothes. I can use any of the techniques that I have learnt this semester, but it has to be big!

My hair design-


Since the brief was big I knew I wanted to incorporate crimping and back combing into my design. I wanted to top part flat so it gives a dramatic effect between the big hair and sleek.

I started with working my way up the hair in sections crimping each part. I started at the bottom and clipped the rest of the hair up and starting crimping until I worked my way to the top. After the complete side of the head was crimped I brushed the crimped hair out and used a comb to start back combing the hair to give it a messy volume look. Once the hair was all back combed I combed the top part down (which I didn't crimp). Then I sectioned the hair into a middle parting and picked up the front part of the hair and started creating a plait. I then pulled the plait over where it separated the hair between the bottom crimped section and the top flat section. I pulled it across and gripped it into the hair. 

Overall I feel I stuck with quite simple design however It works well and looks very fashionable ready for a catwalk. The hair design contain elements of techniques we've learnt over the past few weeks which is back combing, crimping and plaits. I feel the style suits the brief well and contain big hair for a catwalk. Unfortunately I couldn't finish the other side of the head in time so I think If I could work on something I could work on my time management creating the design, If I could improve this design I would maybe time French plaiting round the head instead of just bringing a normal plait round. 


Thursday 27 November 2014

Final Practise at my Partners Hair Design


In today hair session it was my last time to practise on my partners hair for her design. I had to make sure I could complete the whole design and that it was looking neat and secure. In each hair design iv'e practised on Beth Iv'e used the same padding in the hair. The padding is a circle shape and is filled with couch roll, we was going to fill it with something a little softer so its easier for me to put the grips in however if the padding is softer where Beths hair is so long and heavy we thought nothing else would hold the weight of her hair up, after this decision we decided to keep the same padding. 


I started with sectioning the hair off, I left hair at the front to create the wiggle plaits and also hair to cover the final bit at the front of the beehive. In Beths design she wants averagely 8 wiggle plaits all together at the front, this was 3 plaits going up the beehive each side (6 all together going up) and 2 crossing over framing the front of the face. Once this section was out of the way at the front I then started on creating the beehive. Most of my time is spend on creating and structuring the beehive as there is so much hair and its so hair I have to make sure its all secure and gripped down. I placed the beehive directly behind the parting of the front section and starting pull strands over one by one to secure the bottom layer to the head and the padding. I then gathered larger sections of hair and gripped it all into place and just left 4 strands at bottom.


I then separated the bit at the front that I left when I sectioned the hair at the beginning and started building that up at the front of the beehive, this was just to cover the front and make sure it looked neat and the padding wasn't showing. I then took down the next layer I separated which was for the wiggle plaits and I started grouping them into threes to create the plait. I started with the middle 6 and created all the wiggle plaits and gripped them to the top of the beehive. With the 2 outer plaits I brought them both across to meet at the middle and gripped them in place. 


When I put the wiggle plaits on the beehive I was left will a few strands left hanging over the back, normally I just clip them in and in Beths design they are just gripped to the back. However I asked her opinion if I could change the design slightly and plait the strands and grip it to the back so it looks more interesting and elaborate at the back. 

Next was working on the final 4 strands at the back of the head. Like the previous design I wrapped the strand around my finger and gripped it to the hair, this looked like flat curls on the head, Quite similar if I was using curling tongs. I created the 2 outer ones at the bottom and the 2 middle ones a little higher. Finally the last Elizabethan touch to the hair design was pearls, we bought some pearls with holes in them this way we could put a grip through the hole and grip it into the hair. I placed the pearls in the 2 front wiggle plaits that met in the middle, this gave the final touch to the design. 


side/back

top/front
front
RSide
Back
Selfie with my partner
Overall I'm very pleased with the outcome of this design as I definitely think its the best one iv'e created so far. Each piece of hair went perfectly well and each technique went to plan. The beehive is the hardest thing to tackle as It needs so much structure and work to keep it up. The hardest this is getting the pins in the hair as that is a little bit of a struggle because I have to put so many grips in and the hairs so thick and layered up its hard to put them in the hair. The rest of the design went really well and I think for a complete hair design the outcome came out really well. My timing for creating this was 1 hour and 30 minutes, I need to cut my time down slightly however hopefully on the day If I just work at a faster pace then it should all go to plan.


 Historical Elizabethan Hair comparisons to the design I'm creating

http://www.pinterest.com/pin/83598136803406647/
I think this 16th century beehive represents the historical hair design that I have created from Beths Design.This beehive has a similar hight to the hair which is incorporated into this design. Beth hair throughout will always look contemporary because of the texture and type of hair she has. Each individual plait gives a texture to hair with black, purple and brown running through the hair.
https://ndla.no/en/node/98522?fag=42&meny=101439
The flat pin curls at the front of the hair are very similar to the 4 pin curls I created the the bottom back of the hair. The technique is very Elizabethan however the hair style and type makes it very contemporary. This design also contains pearls placed on the top of the hair design and framing the front of the hair, again this element is in the hair design I created.
http://ladiesof2318.wordpress.com/2011/09/12/thumper-elizabethan-research/
This historical hairstyle has been re-created in modern day however has completely created a tradition Elizabethan hair design. The pearls and pin curls are a comparison to this historical design and my contemporary Elizabethan design.


Sunday 23 November 2014

Working Further on my Partners Hair design

In my recent hair studio lecture it was my turn to practise my partners design on her hair. By now I feel much more comfortable working with her hair and I'm picking up a much quicker pace. Beth hadn't got a final drawing of the hairstyle she wanted me to create however she had a collaboration of photo to show me. As in the previous lesson we experimented with the technique 'wiggle plait' and Beth really liked the technique and how it looked in the hair. Beth described to me how she wanted it too told and said it was pretty similar to the previous design I created on her. 
I started off with using the rat in the hair, this is exactly the same padding that was used in my previous design for the wiggle plait. Its just a ball of couch roll which has been put in a pair of tights. In the practise session the tights were a tan colour however on the day of the assessment I want it to be black so it matches the hair and blends in more in the design. I started with sectioning the front area were the wiggle plaits would be, each wiggle plait needs three strands of hair so I sectioned it off in three's. I then sectioned another area which I will use to cover the front of the padding. Once the front sections were out the way I placed the rat on the top of the head and started building up the hair over the rat and gripping it through the padding and securing it to the hair closest to the scalp for security. 
After I placed a decent amount of hair over the padding I realised I placed the rat to far back on the head and it was leaning back. I then had to go back and un grip all the pieces of hair that I had already gripped up and start again. This time I moved it up slightly and started to grip all the pieces of hairs up again. I start with stand by stand to secure it to the head and the padding and then I started grabbing three strands of hair at a time and bringing it all over and building it up. I've learnt from the first time I worked with Beths hair as I tried to put too many pieces of hair up at once and eventually its too heavy and not secure so it just falls. I've learnt from this mistake and realised I have to build the beehive up bit by bit to make sure its secure. Once al the hair was up in a beehive I left four strands of hair at the bottom and I still had the strands at the front to create the wiggle plaits. For the this I grabbed the three stands of hair, plaited it loosely and with the two strands on one side, I pulled them upwards to the roots of the hair to create the wiggle effect.
I created five main wiggle plaits in the centre which were gripped up at the top and two on each side by the ear which were brought around to the middle of head and gripped in the centre to the other wiggle plait. All the plaits and beehive were gripped with black bobby pins and wide set black grips as well. 

With the final 4 strands I left at the bottom, I wrapped the hair around my two fingers and gripped them to the roots of the hair. I did this with each strand so it created four twists at the back of the bottom of the hair. This wasn't originally in Beth design however instead of leaving the bottom bit down like in the last design we decided to add another technique to the design. I think this makes the hair look more Elizabethan as when the hairs down it looks very contemporary.


Overall I'm very happy with the design and I think it came out very well, the part that takes the longest in the hair design is creating the beehive this is because it takes structure and time to place each bit of hair up. Iv'e definitely become quicker at working with the hair which is good progress and I've become more confident. On the final assessment I think I need to present the wiggle plaits a little bit neater and try and get them the same size, however this is hard because each strand of braid in Beths hair varies. I think with the twists at the bottom of the hair could be neater and more secure as they felt a little loose. And of course the padding to be black to match the hair, overall I'm very hair with the hair design and it look me 1 hour and 10 minutes to create the final hair design so I do feel confident for the assessment as long as everything goes smoothly. 


Tuesday 18 November 2014

Mood Board of Hair Design for my Assessment Partner


Here I have a variety of inspirational Images that make up my final hair design which my partner will create on me. I have included photos that show similar techniques that will need to be used to complete my hair design and also similar style and shape. My photos contain images from Historical Elizabethan hair designs as well as ones from recent high end fashion runways and also contemporary Elizabethan hair designs. This show my variety in the historical and modern designs and also the variety in my use of technique and style. 

http://careforhair.co.uk/hairstyle/braids-plait
http://www.hji.co.uk/hair/14-springsummer-2015-braids-copy-catwalks/
http://www.itslavida.com/the-return-of-the-plait/
http://beautyhigh.com/chanel-prefall-2013-hair-heights/
http://www.pinterest.com/zitong/fashion-chanel-pre-fall-2013-edinburgh/
https://blogger.googleusercontent.com/img/b/R29vZ2xl/AVvXsEj0y5cvYMZ-amGOJO73O1Clxt3IgiobX1MwxyXump2K9EXZZ46FRbTPfK6ZGbw-Ic5CYwcTTuBfJ1nY_eVfiEnASBGD1-uJ46BzxHnhr2H8bg1JwICA6qq38-fB1l-6w9LArG00elsulnLo/s1600/heart-shaped-funny-vampire-hair-styles-girls.jpg

Monday 17 November 2014

Practise of my Final Design- Assessment Partner creating my design on me

Since my assessment partner last created my hair design, I have decided to stick with that same design as I like it the best out of the three final design I drew up. I think is has the most potential out of my three designs and contains a variety of elements that are techniques that were used or represent the era of the Elizabethans. My design contains a variety of skills we have learnt and practised on each other over the past few weeks. My design has frizzing/crimping, plaiting/French plaiting, heart shaped beehive with padding and a bun. Most of these are elements and techniques the Elizabethans would of used and I created a contemporary design from the era that shows history and modern influences to the design. 

In our assessment practise lesson today my partner, Beth, yet again created the hair style with the improvements added in. Beth started with crimping the hair which still took 45 minutes to do the whole head. She then started sectioning the hair and created all the plaits making sure they were all sectioned equally and were plaited neat. After the crimping, she brushed through the crimping and started with the plaits, from the moment of brushing my crimped hair to sectioning and plaiting all the head this took her again 20 minutes. Beth did not rush creating the design we tried to time everything perfectly at a good pace so the design was neat and accurate. This time she added the rats in, this was one on each side of the head to create the heart shape. She tried to get the padding equal and symmetrical on each side and for them to be the same height. Once the beehive was done she had to create the bun which this time I wanted it larger than before. She started with putting all the hair up in a pony tail and then back combing it from the roots, she sectioned the hair in fours, rolled the hair over and gripped it to the base of the hair, then spread the four parts to blend into one large bun and gripped it in place. Overall the beehive and the bun took 25 minutes to complete. Overall the design took Beth 1 hour and 30 minutes to complete. On the day of the assessment we don't want to rush the design, because sometimes rushing can potentially ruin the hair design itself. Therefore when asked by our lecturer if we wanted any time before the assessment to prepare the hair we said yes, before the assessment Beth is going to crimp my hair in preparation to create the rest of the design. This means when completing the design on the day, created the plaits, bun and beehive should take Beth her normal 45 minutes to create the rest of the design, this will then give her plenty of time to achieve neat cornrow and the perfect symmetrical heart shaped beehive.

After Beth created my design I was very happy with the overall look of it, it felt very secure on my heat and was very neat. The bun was a much better size and I preferred it bigger and the same for the beehive. When thinking about my design during the creation I was thinking about including some pearls to the hair design, I thought it would look nice if there were a few pearls pinned into the bun at the back of the hair just to give the design a slight more of an Elizabethan feel and also using an accessory.

On the day of the assessment I need to make sure to bring pearls for the design that will create on me, I will bring my own rats for the beehive. The grips, hairspray, hair band and crimpers will be in the studio on the day we just need to ask the lecturer to supply them for us before the assessment begins so we are prepared. On the day I will need to bring in my drawn up design of the hair style, a step to step guide of how to create it and maybe additional photo showing the design I want in case the drawing isn't clear enough. Apart from that the combs and brushes will be supplied from Beths hair kit that she will need to bring on the day. 

Overall I'm very happy with the outcome of the design I think Beths matched it up very well to my drawing and its exactly what I wanted it to look like. I think the assessment day will go to plan as we have practised it once, created the final thing once as well and she has already seen my design plans before hand and the explanation of the design


Assessment Partners First attempt at One of my Hair Designs


This was design two from my last blog post, this design had some extreme plaiting incorporated into this contemporary Elizabethan hair design. The basics for this design was two cornrows parting the middle of the hair at the front, braided all the way down to the front of the forehead, down the side of the head and up to the bun. At the would be 4 cornrows separate that would be braided to meet the bun in the middle, so when looking at the back all together there should be 6 plaits and on the top would a heart shaped beehive. 


My assessment partner; Beth was able to have a look at the designs I drew for the assessment, we eventually chose to go with the one that has the cornrows coming up the back which two of them originally started in the middle of the head and framed the hairline all the way round. When practising hair designs with Beth I noticed that she was very good at cornrows, therefore I definitely  wanted to add a hair design around it. In the Elizabethan era plaiting the hair was very popular and today the modern twist of a plait is probably the French plait as its a little more difficult to do. 


As soon as the studio lesson started we go right into the design where I briefly told her what I wanted it to look like and showing her my design I drew and also the photos that gave me inspiration to create the design. We wanted to use this session to find out how long each section of the hair took and what could be improved in my design, including feedback from the teacher. Beth started with setting up our work station and  began with crimping my hair, after this was completed she sectioned the line of where the cornrow would be at the front and clipped the rest of the hair back. She started on one side and plaited from the middle, down and all the way round. 

Then she started at the back where the cornrow would be going upwards, I had to sit with my head facing the ground so she could plait them all upwards. We realised we were coming close to the end of our lesson when Beth started creating the heart shaped beehive. Therefore when creating the beehive she didn't get enough time to put in the rats to give height and volume to the beehive. Instead we proceeded on without the padding this time just to see the overall design. Finally, she pulled the rest of the left over hair all together and put it into a bun. 

Overall the crimping of the whole head took 45 minutes, the cornrow took 20 minutes, and the bun and beehive took 20 minutes. However next time we need to include the padding to the beehive. During the real assessment we will have around 1 hour and 20 minutes to complete the whole design, however on the hair before hand you can prep the hair ready for the assessment to cut down on timing. Improvements I would do to this hair design for next time is I would want the bun to be a little bit bigger and voluminous. We will definitely make more time in next lesson to include the padding in the hair so that the beehive is bigger and more secure. Next attempt we definitely need to time each area properly so that on the day we are completed in good time and also see what hair preparation we want to complete before the assessment. Overall I think Beth executed the Elizabethan hair design I drew very well and came out how I wanted it to look. We have a few things to tweak on the design however overall I'm very satisfied with the outcome.