After creating multiple hair styles
and learning a variety of techniques we creating a full Elizabethan hair design
on our Kate heads. For a few weeks now we’ve been working on the Kate heads and
our lecturers wanted us to start work on human head, and getting used to
manipulating a person’s head. It’s much easier to work on a Kate head as you
can move the head round 360 degrees and forwards and backwards however when
working on a humans head you can’t. You also need to be delicate with your
movements on a human head as it can be very sensitive as you can’t be as rough
as when working on the Kate heads. In this design we had to incorporate at
least a few techniques we’ve learnt over the past few weeks such as curling,
crimping, frizzing, buns, plaiting and also using a rats in the hair. In my
design I chose to incorporate curling, frizzing and crimping into my hair
design. Once I chose my model I evaluated her hair, it was thick and long, it
was in good condition as there was no breakage at the ends, and the hair was
quite oily however this made it easier to style. We had a time frame of two
hours however in this period we had to set up our work station and all of the
equipment needed, pair up with a peer and create the full hairstyle.
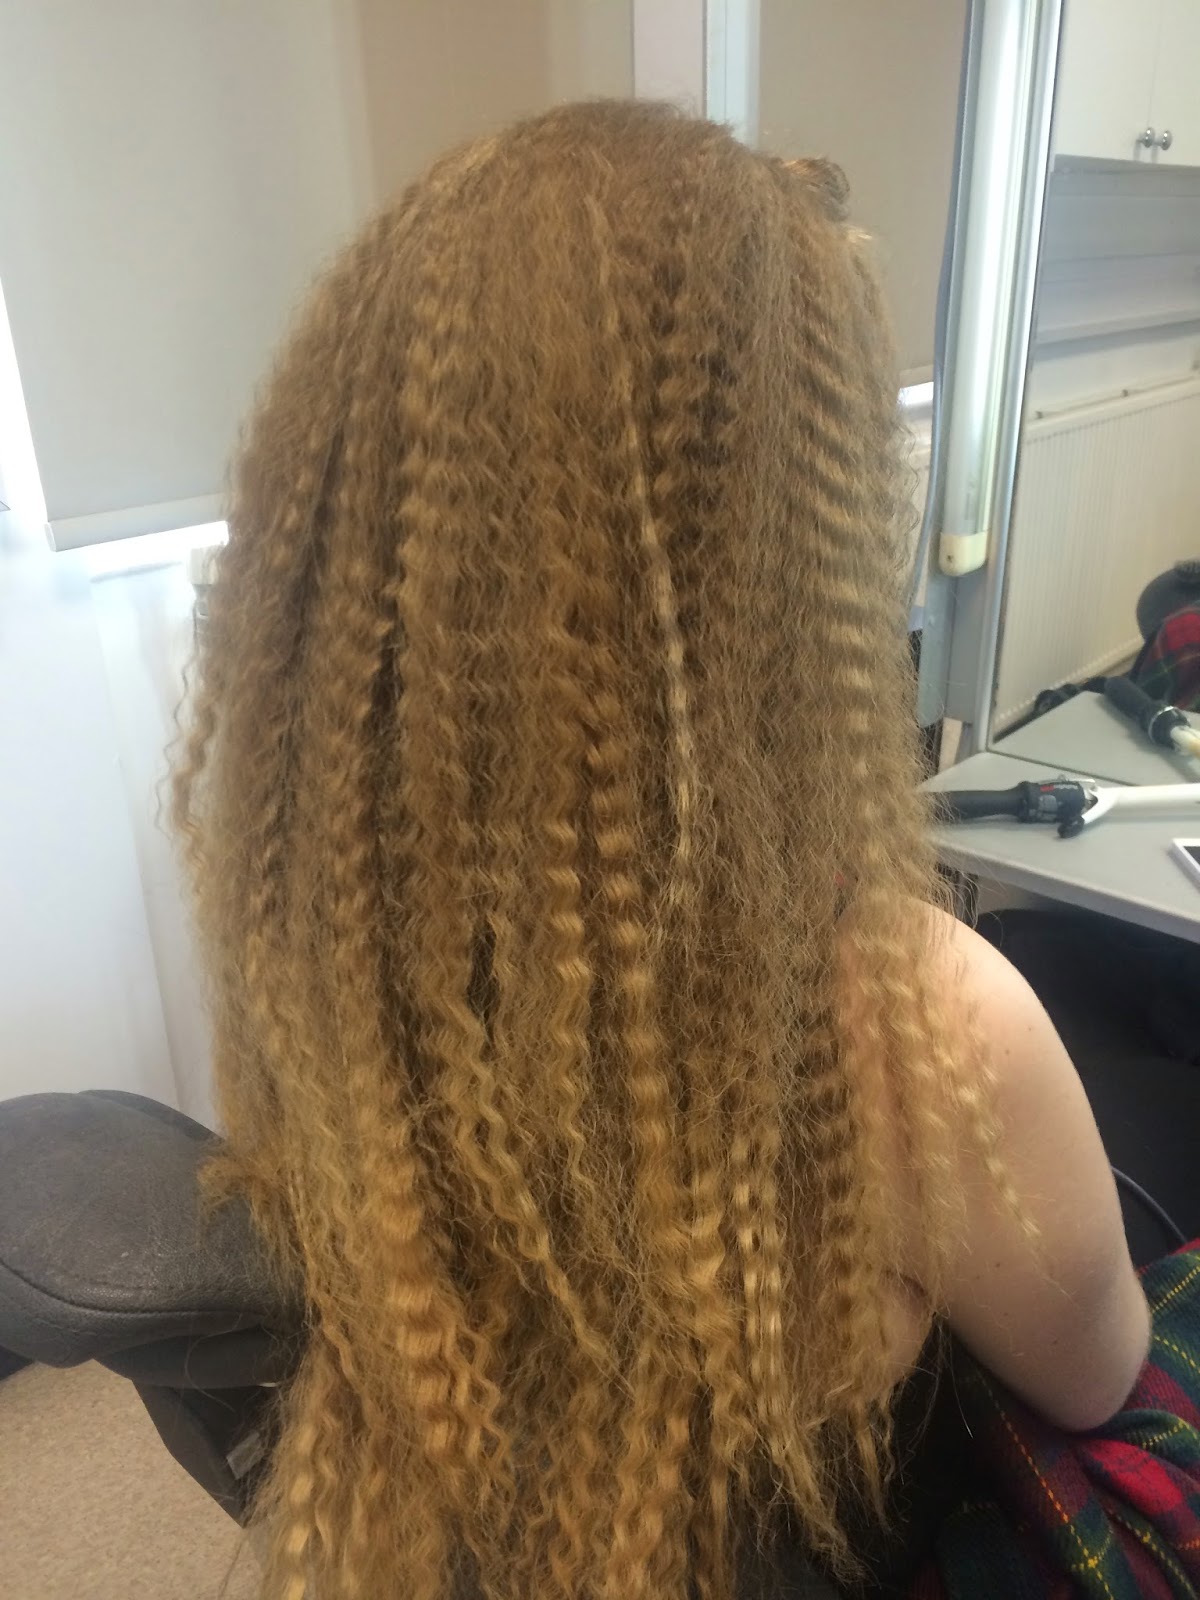
I started with crimping the whole of the hair. I started at
the bottom of the head and worked my way up the head until I reached the front
of the hairline. I knew I wanted to curl the front of the hair and frizz the
two side’s bits so I clipped them apart from the rest of the hair so they
weren’t crimped.
Once I finished crimping the hair I then started with the two
original strands I left at the side of the head by the ears. I used a geisha
pin (because they are large) and put the hair in the pin and wrapped the hair
round, in and out of the pin in a figure of eight. With the end piece of the
hair I wrapped it around once more and used a normal pin to hold the ends in
place.
I
then started on curling the front of the hair I
took the section I left at the front of the hairline and used small curling
tongs. I separated the strands of hair at the front and curled them
individually and put a grip in the curl to hold it in place while it cools
down. I found this slightly harder to do on Human hair than on the Kate head as
the Kate head is slightly coarser so it says in place a little easier.

I then separated the hair in the
middle of the hair at the back along where the ear is. I then French plaited
down the side, plaited the extra bit of hair and then wrapped the plait back up
and gripped it to the head. This plait was in place to secure the rats to the
head this is to give height to the hair when creating a beehive. The rats is
basically a pair of tights cut and filled with tissue, you then put the grip
through the tights and grip it to the plait. This is to secure the rats nicely
to the head. I found it a little tough trying to attach the rat as where it was
slightly on an angle it keep falling slightly so I had to place quite a few
grips there to make it secure. When creating the beehive I literally brought
the front crimped bit, back combed it and brought it over the rats I then
gripped the hair into place and left the bottom part of the hair down.
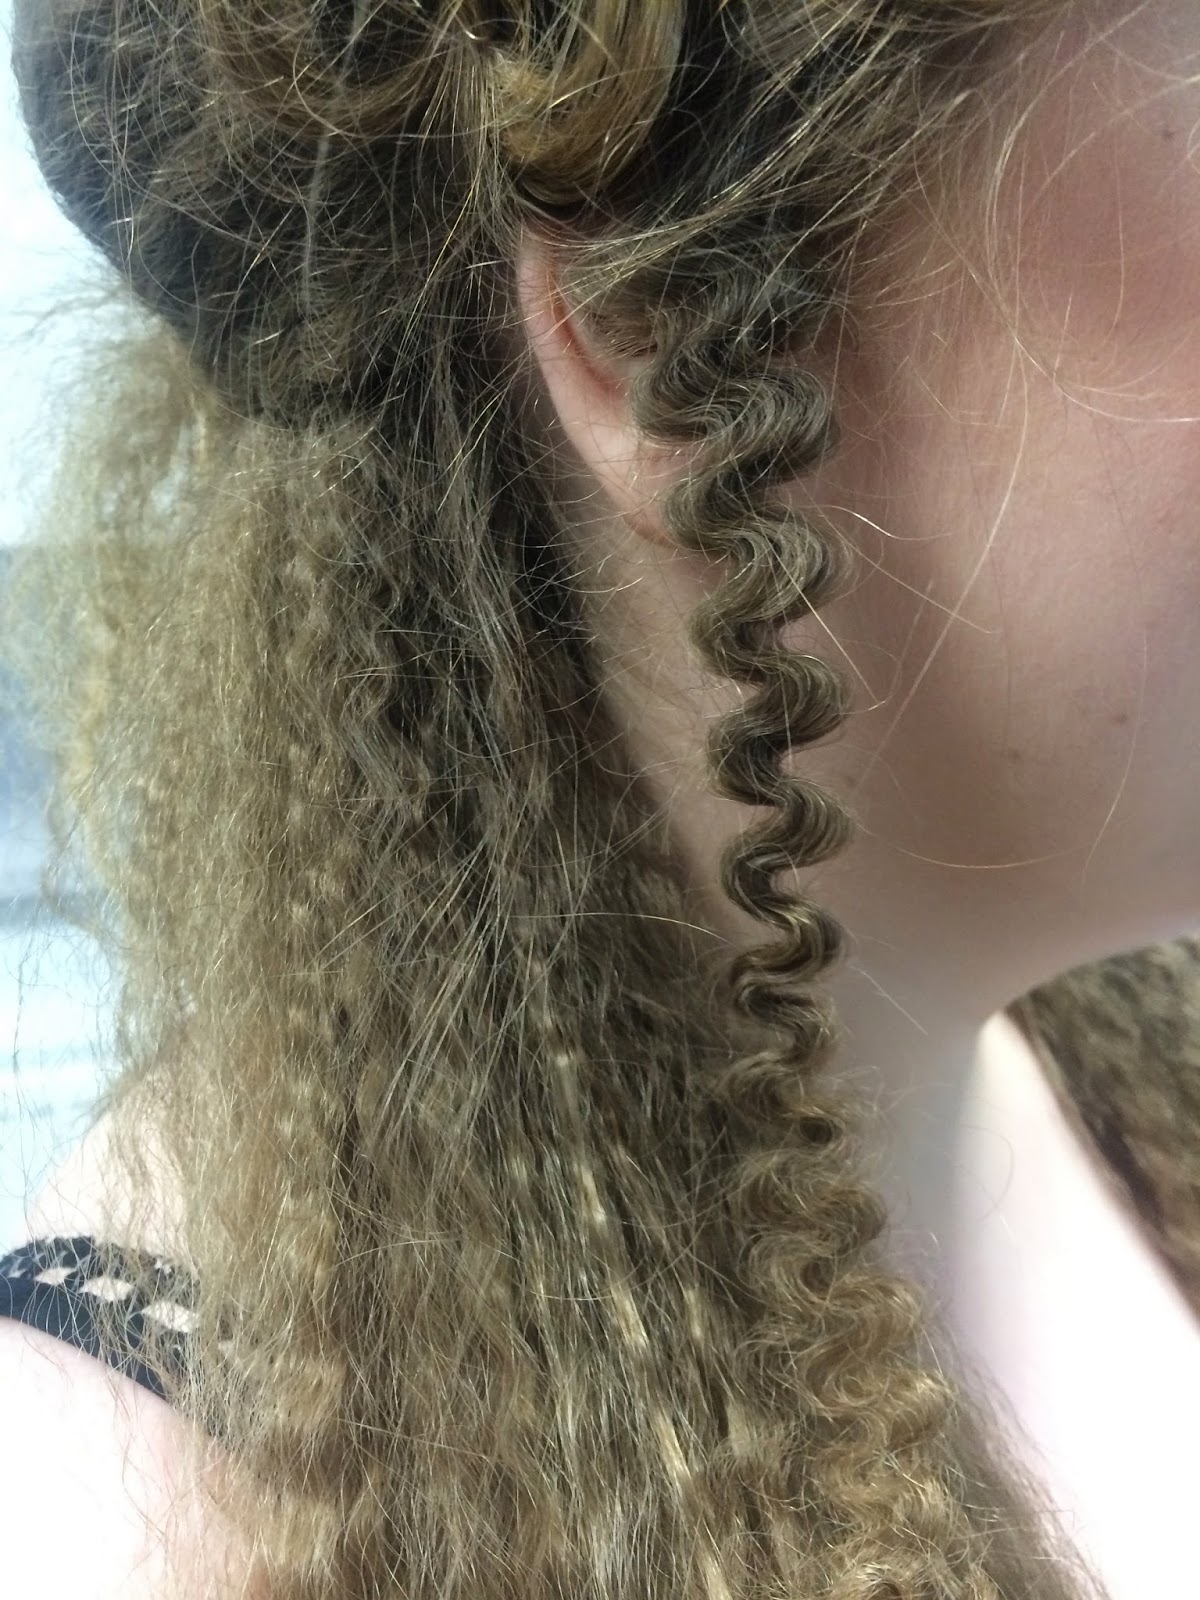
Next I took the geisha pins out the side part of the head. When taking the pins
out, all you need to do it take the bottom grip out and then slide the geisha
pin out and it comes out like this. You can separate the curls to make a few
more or even brush it out however then it goes very frizzy. I like this design
because I think it complements the crimping very well as I looked like extreme
crimping and it comes out very neat and goes well with the overall hair design.
 With the curls at the
front of the head I took all the grips out of the curls once they were cool and
let them down. I then wrapped the curls up into their original small curl and
gripped them to the head. I had around seven curls on each side of the head and
gripped them up so they were sat on the beehive. This is the first time where I
have created so many curls and had to pin them all up as normally I only do
four or five however this time I used a larger section of hair at the front. I
placed them in no particular place I just gripped them where I thought it would
like nice and where the curls would sit.
With the curls at the
front of the head I took all the grips out of the curls once they were cool and
let them down. I then wrapped the curls up into their original small curl and
gripped them to the head. I had around seven curls on each side of the head and
gripped them up so they were sat on the beehive. This is the first time where I
have created so many curls and had to pin them all up as normally I only do
four or five however this time I used a larger section of hair at the front. I
placed them in no particular place I just gripped them where I thought it would
like nice and where the curls would sit.
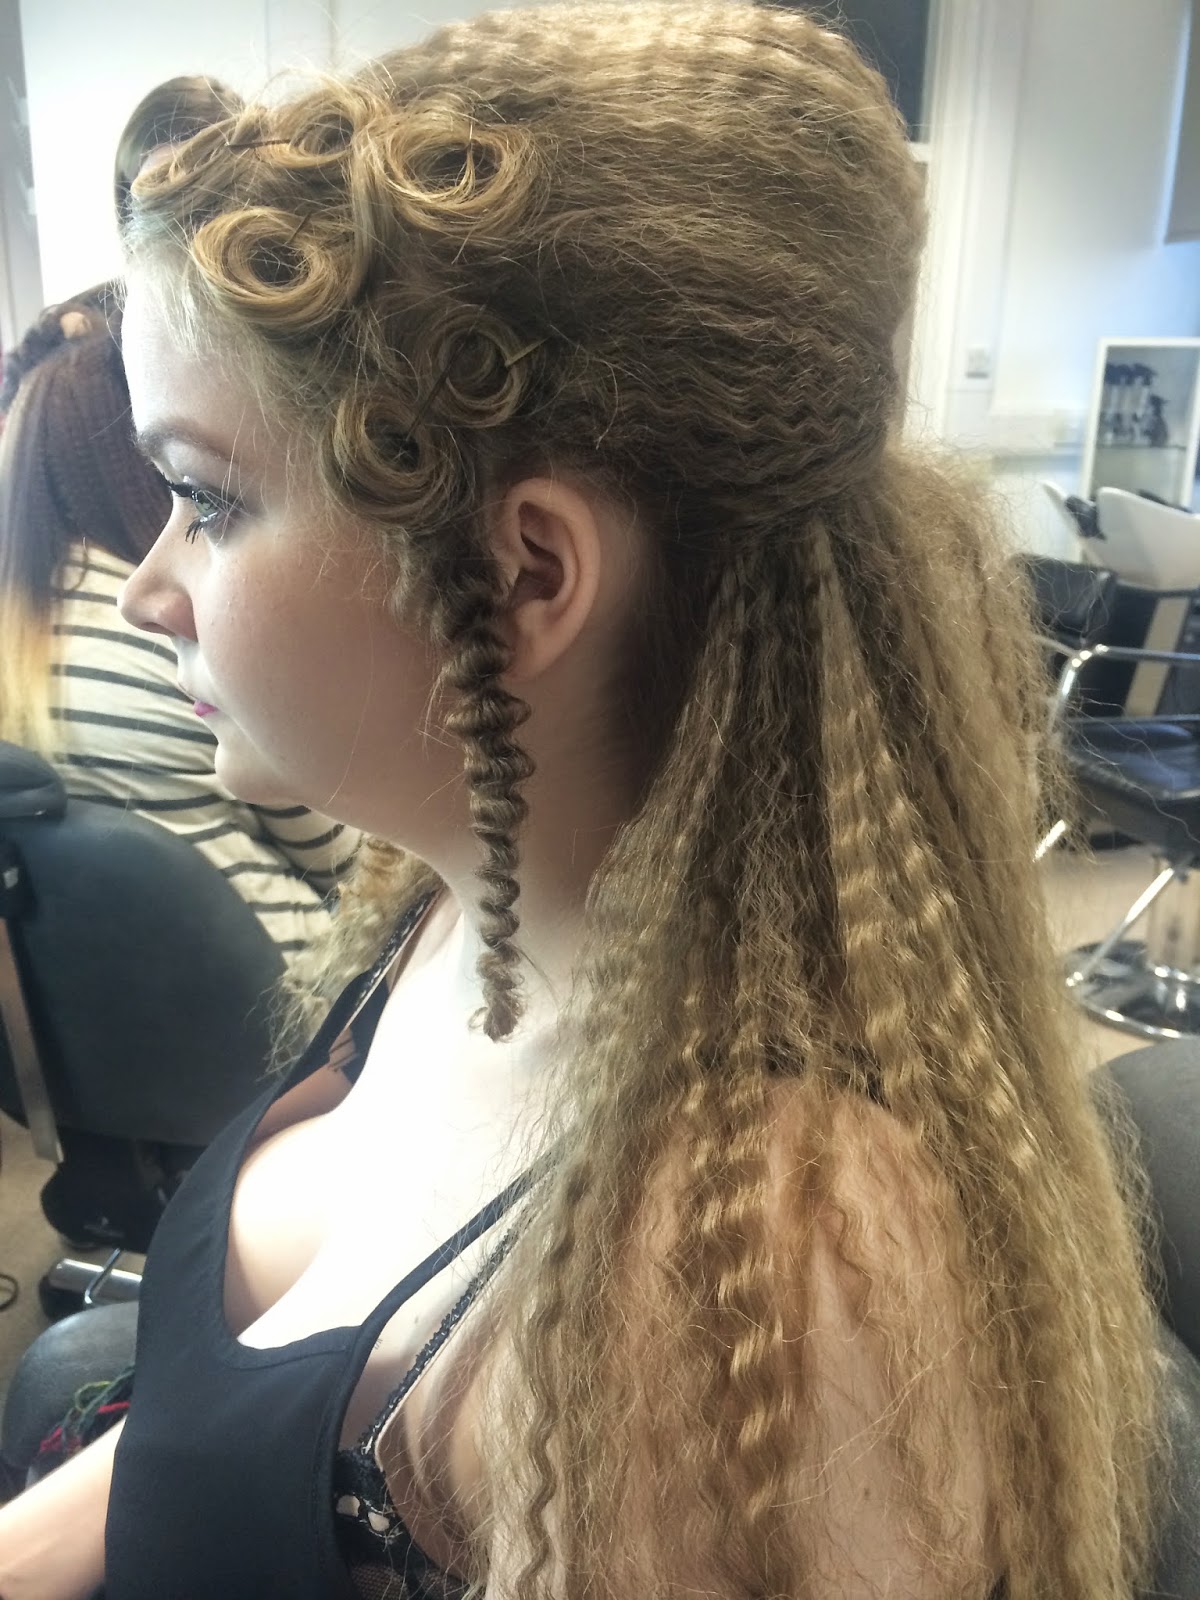
For the final touch I back combed the
back end of the beehive where it was gripped give to give a little more volume
and dimension. Overall I'm very happy with the outcome of the full hair design,
I personally found it harder to work on human hair as you can’t manipulate the
head as much and the Kate heads hair is much coarser so it says in place easier
than human’s natural hair. With the presentation of the hair I think the
crimping is nice and neat and even with lots of volume, the frizz came over
very well and stayed in the hair extremely well and is a fantastic technique,
the curls were placed nicely and look very satisfying on the head. I think the
only thing I slightly struggled with was putting the rats in place and pinning
the curls to the head as it was hard to keep them in. However overall I’m very pleased with the outcome of the Elizabethan hair design and my time management has got better since the last session as I created this design in around 1 hour and 45 minutes.


 Once I had located my padding, I started with creating the beehive, as I learnt from before the part that takes up most of the time is creating the beehive, this is because my model has so much hair, and it’s very thick and long. This means when creating the beehive I have to section the hair out and grip up a few braids at a time otherwise the weight of the hair in one go will pull it down and it won’t be secure. I section to front of the hair that I wanted to keep out and the bottom back of the hair I wanted to keep out as well. When placing the rats on her head I took a braid from the front and one from the back and tied and knot and the top and the same with the sides, this made the hair look like a tied parcel. I then gripped the hair to the roots of her braids and the braids to the padding to create security. I then purely started grabbing each bit of hair from each side and started building it up make sure the padding was covered and the hair was secure to the padding and her head. Once all the hair was gripped into place for the beehive which took most of the time up as there is so much of it, I wanted to start on the front of the hair.
 This is where I wanted to incorporate the wiggle plait into my design. I sectioned the hair at the start before creating the beehive to make sure I have sets of threes at the front to create the wiggle plait. I basically started plaiting the hair and then when it came to the end of the hair I pulled the two strands up to create the plait. This gave a very thick and textured look as I was plaiting hair that was already plaited which gave an amazing texture and three dimensional look to the hair. I couldn't carry on plaiting the rest of the section as the strands were too thin at the end of the hair and the one stand was too thick so I left it like that. I then pulled the wiggle plait of the head with the end strand and gripped it into the beehive as well as the long strand of hair left over. I left enough strands to create four wiggle plaits on each side. I started form the middle of the head where I created a middle parting (very Elizabethan) and then worked my way down the side plaiting each one and gripping it to the beehive. When I came to the last piece I was playing around with the placement of the plait and was originally think of doing something to cover the hair at the front this is when we pulled the plait over to connect the middle and it looked really good and framed the front of the hair and felt very contemporary Elizabethan. I then completed the same on the other side. For the back of the hair I wanted to leave it down, this lengthen and expands the design so it doesn't all bulked up on the top, I think keeping it partly down still is very Elizabethan as they would often leave the bottom part down, however my models just looks very modern and contemporary as its all braided.


