Wednesday 29 October 2014

Elizabethan Hairstyle- Working on Human Hair


After creating multiple hair styles and learning a variety of techniques we creating a full Elizabethan hair design on our Kate heads. For a few weeks now we’ve been working on the Kate heads and our lecturers wanted us to start work on human head, and getting used to manipulating a person’s head. It’s much easier to work on a Kate head as you can move the head round 360 degrees and forwards and backwards however when working on a humans head you can’t. You also need to be delicate with your movements on a human head as it can be very sensitive as you can’t be as rough as when working on the Kate heads. In this design we had to incorporate at least a few techniques we’ve learnt over the past few weeks such as curling, crimping, frizzing, buns, plaiting and also using a rats in the hair. In my design I chose to incorporate curling, frizzing and crimping into my hair design. Once I chose my model I evaluated her hair, it was thick and long, it was in good condition as there was no breakage at the ends, and the hair was quite oily however this made it easier to style. We had a time frame of two hours however in this period we had to set up our work station and all of the equipment needed, pair up with a peer and create the full hairstyle.


I started with crimping the whole of the hair. I started at the bottom of the head and worked my way up the head until I reached the front of the hairline. I knew I wanted to curl the front of the hair and frizz the two side’s bits so I clipped them apart from the rest of the hair so they weren’t crimped.


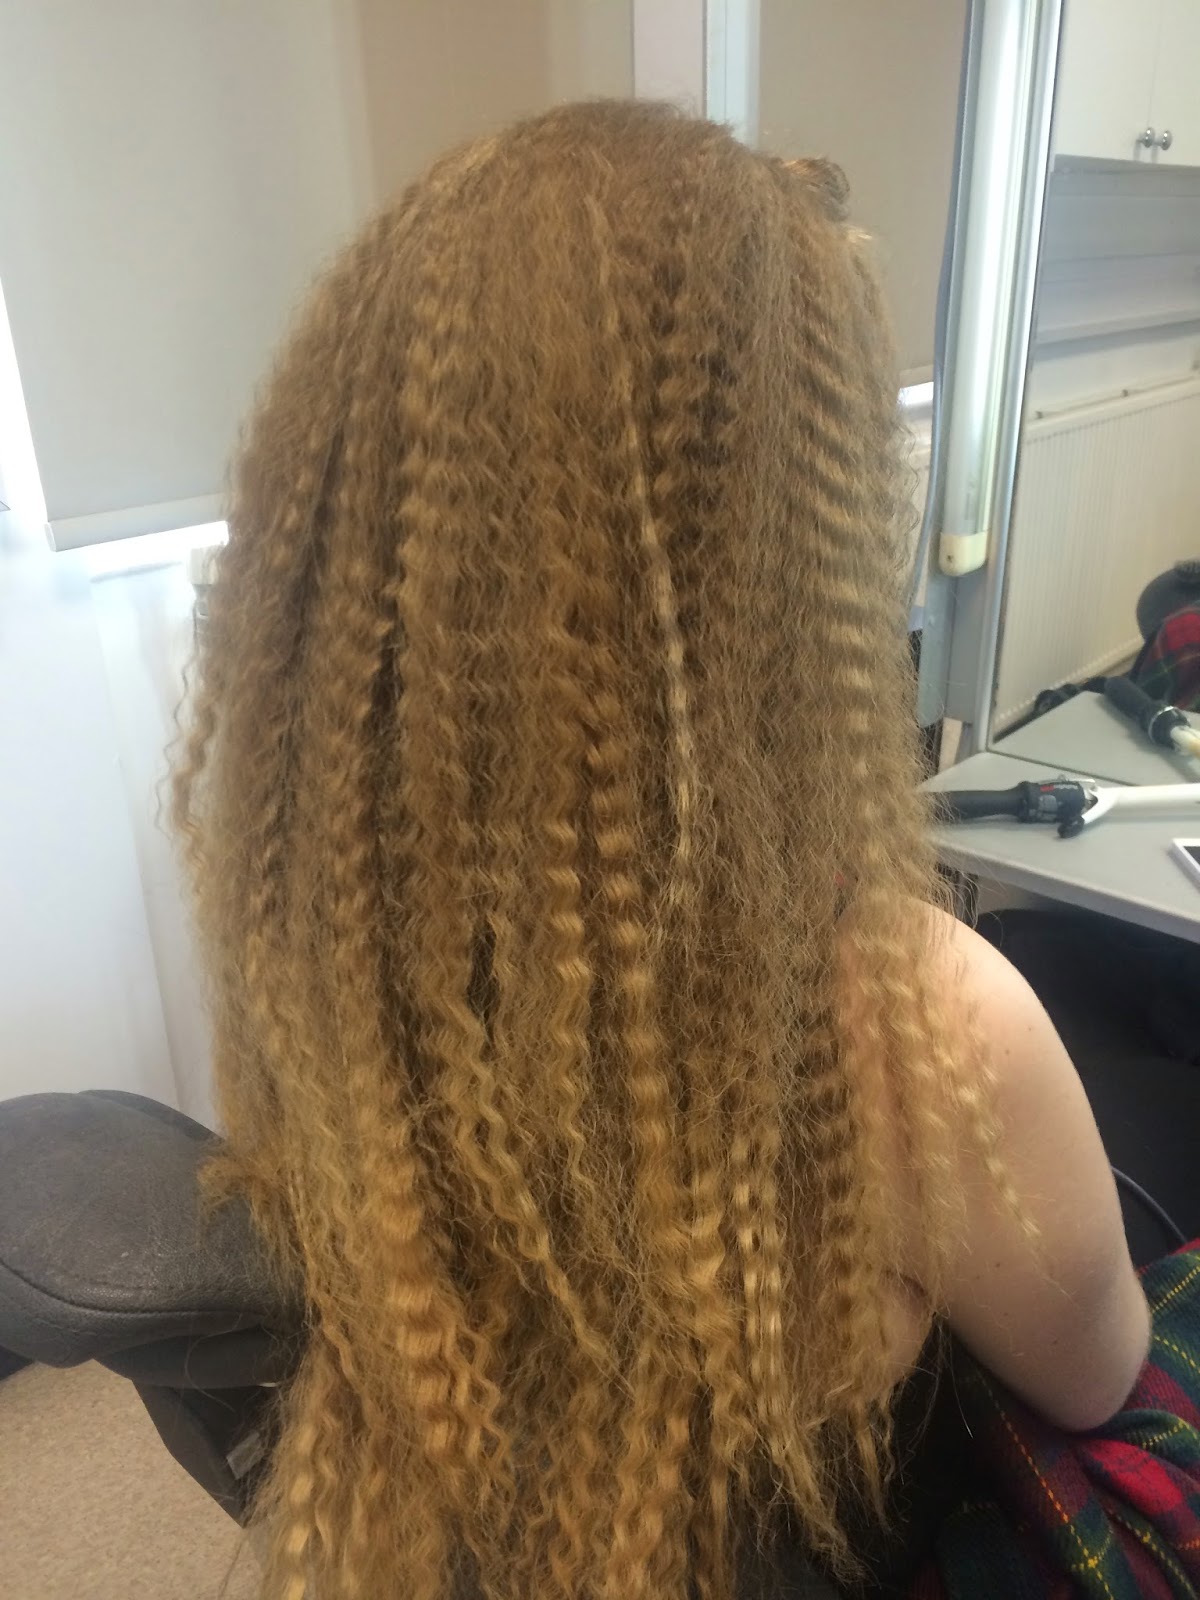
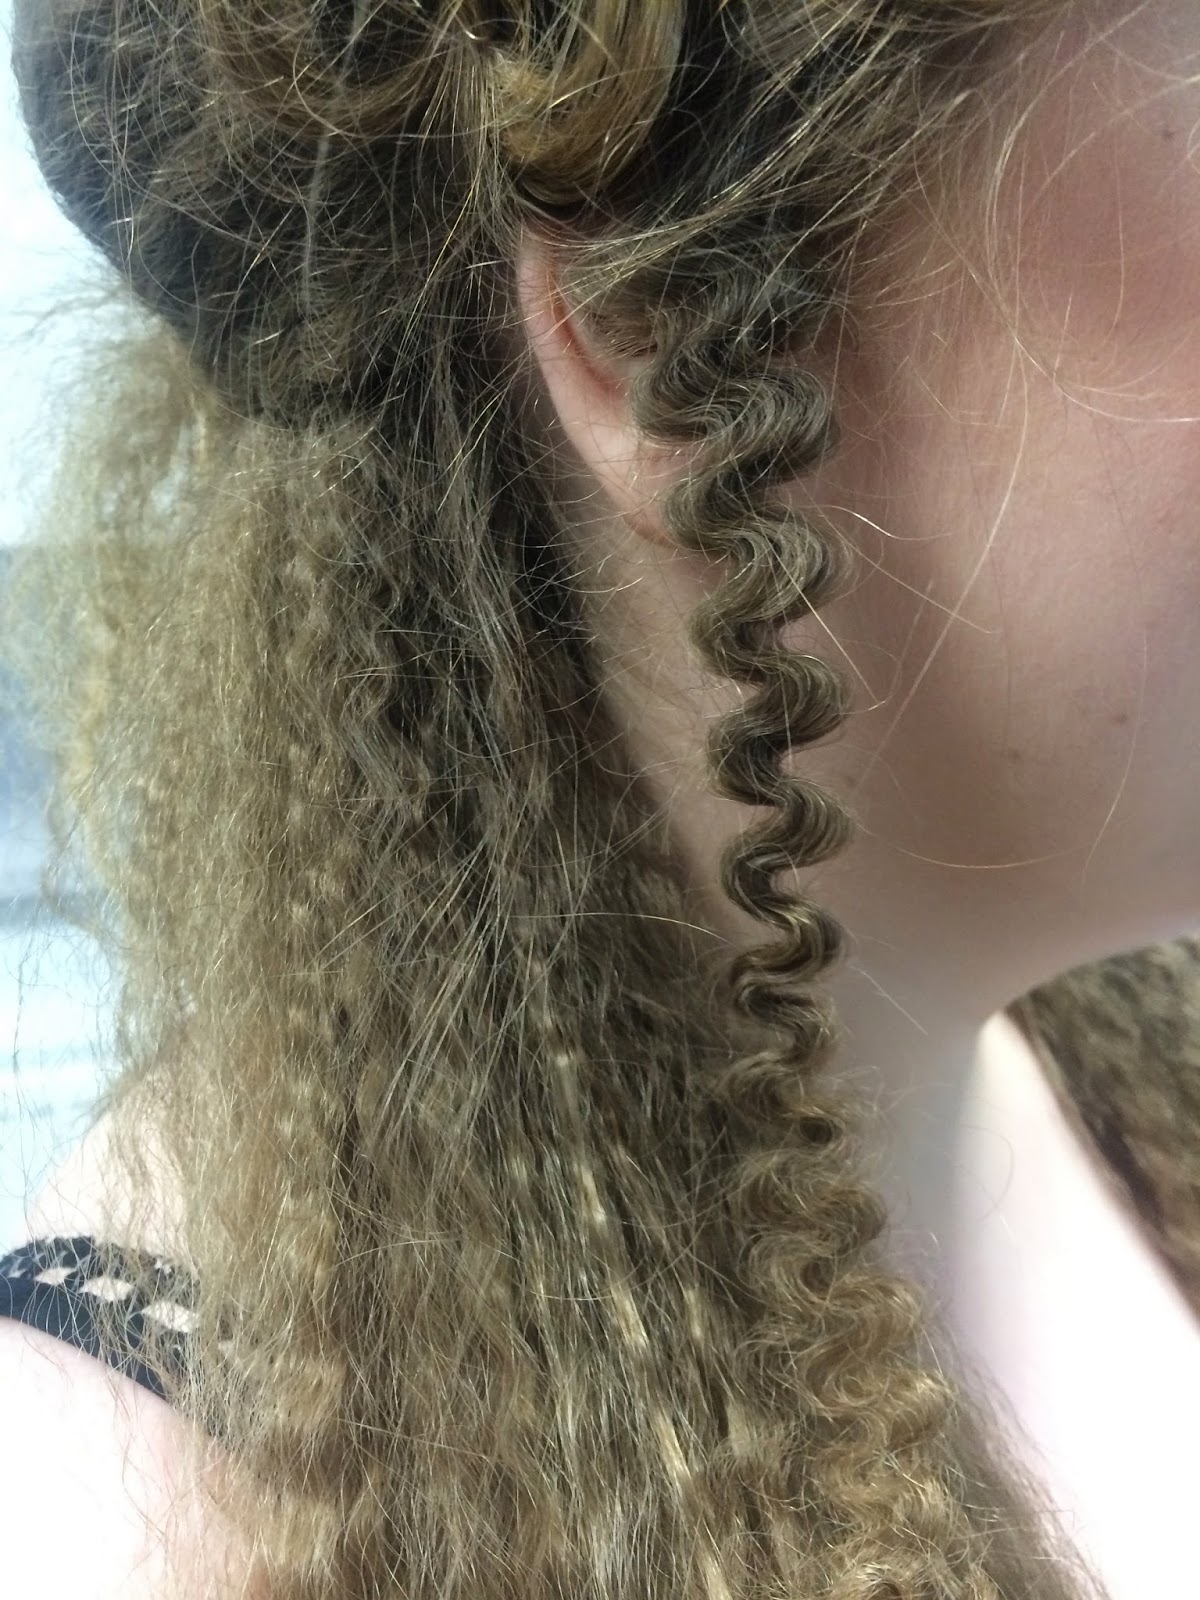
Once I finished crimping the hair I then started with the two original strands I left at the side of the head by the ears. I used a geisha pin (because they are large) and put the hair in the pin and wrapped the hair round, in and out of the pin in a figure of eight. With the end piece of the hair I wrapped it around once more and used a normal pin to hold the ends in place.


I then started on curling the front of the hair I took the section I left at the front of the hairline and used small curling tongs. I separated the strands of hair at the front and curled them individually and put a grip in the curl to hold it in place while it cools down. I found this slightly harder to do on Human hair than on the Kate head as the Kate head is slightly coarser so it says in place a little easier.


I then separated the hair in the middle of the hair at the back along where the ear is. I then French plaited down the side, plaited the extra bit of hair and then wrapped the plait back up and gripped it to the head. This plait was in place to secure the rats to the head this is to give height to the hair when creating a beehive. The rats is basically a pair of tights cut and filled with tissue, you then put the grip through the tights and grip it to the plait. This is to secure the rats nicely to the head. I found it a little tough trying to attach the rat as where it was slightly on an angle it keep falling slightly so I had to place quite a few grips there to make it secure. When creating the beehive I literally brought the front crimped bit, back combed it and brought it over the rats I then gripped the hair into place and left the bottom part of the hair down.


Next I took the geisha pins out the side part of the head. When taking the pins out, all you need to do it take the bottom grip out and then slide the geisha pin out and it comes out like this. You can separate the curls to make a few more or even brush it out however then it goes very frizzy. I like this design because I think it complements the crimping very well as I looked like extreme crimping and it comes out very neat and goes well with the overall hair design.


With the curls at the front of the head I took all the grips out of the curls once they were cool and let them down. I then wrapped the curls up into their original small curl and gripped them to the head. I had around seven curls on each side of the head and gripped them up so they were sat on the beehive. This is the first time where I have created so many curls and had to pin them all up as normally I only do four or five however this time I used a larger section of hair at the front. I placed them in no particular place I just gripped them where I thought it would like nice and where the curls would sit.


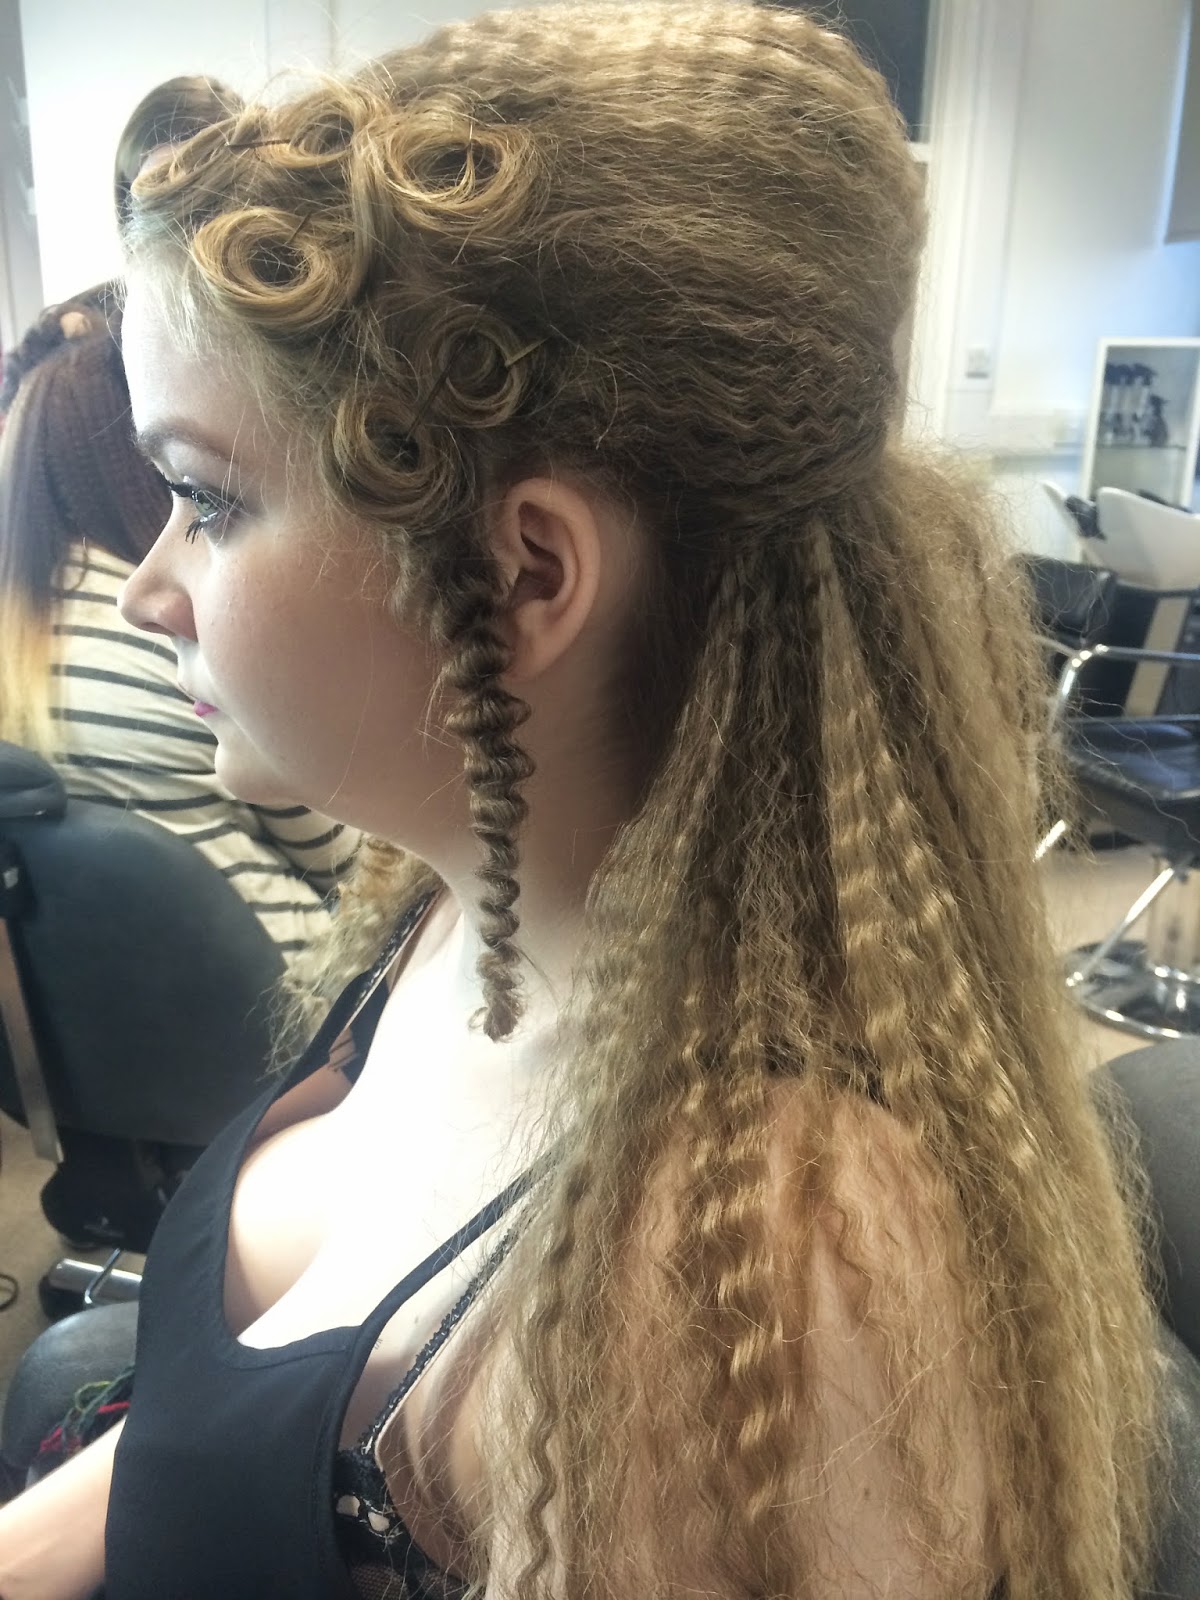
For the final touch I back combed the back end of the beehive where it was gripped give to give a little more volume and dimension. Overall I'm very happy with the outcome of the full hair design, I personally found it harder to work on human hair as you can’t manipulate the head as much and the Kate heads hair is much coarser so it says in place easier than human’s natural hair. With the presentation of the hair I think the crimping is nice and neat and even with lots of volume, the frizz came over very well and stayed in the hair extremely well and is a fantastic technique, the curls were placed nicely and look very satisfying on the head. I think the only thing I slightly struggled with was putting the rats in place and pinning the curls to the head as it was hard to keep them in. However overall I’m very pleased with the outcome of the Elizabethan hair design and my time management has got better since the last session as I created this design in around 1 hour and 45 minutes. 


Tuesday 28 October 2014

Elizabethan Hairstyle

Once we had a few practical lessons of using different types of hair techniques that were popular in the Elizabethan era we started with creating a complete hair design. I had to gather a few ideas of what I wanted to create and it had to include at least frizzing, crimping, curling or plaiting technique. This was because we had to show a variety of skills we've learnt over the past few weeks and put all the skills together to complete a full Elizabethan hair style. I adored the frizzing technique where we had to wrap the hair round a geisha pin in a figure of eight and hold the straighteners on it to heat it into place. I wanted to used crimping as well for the main part of the hair to give it dimension and volume on the top. I also wanted to include curls to the front of the hair which would be more subtle and flat to create a neat pattern on the front of the hair design. 


I started with crimping the whole of the hair. I started at the bottom of the head and worked my way up the head until I reached the front of the hairline. I knew I wanted to curl the front, frizz the sides and the two strands underneath so I clipped them apart from the rest of the hair so they weren't going to be crimped. 


Once I finished the crimping I took the section I left at the front of the hairline and curled all the front. I used small heated curling tongs to create this effect as I wanted smaller curls at the front. I separated strands the strands of hair at the front and curled them individually and put a grip in the curl to hold it in place while it cools down. Once all the sections were curled and pinned in place I started on the next part while these were setting. 


I then started with the two original strands I left underneath the hair. I used a geisha pin (because they are large) and put the hair in the pin and wrapped the hair round, in and out of the pin in a figure of eight. With the last piece of hair I wrapped around once more and used a normal pin to hold the ends in place. I then did this to the other strand of hair and also the two strands of hair left by the ears. 


For the back I back combed the main part of the hair and put it into a beehive. I did'nt use a rats for this style because I finish the hair style off at home and I didnt have one at that particular moment. Instead I back combed the bottom part of the hair, wrapped it up and gripped it into place, I then back combed the top half and pulled it over to the middle part of the head and gripped it into place. I feel as the hair was back combed and crimped it contained a lot of volume anyway so I achieve the height with these techniques. 


With the curls at the front of the head I took all the grips out of the curls and let it down. I then wrapped the curls up into there original small curl and gripped them to the head. I had four curls going along each side of the head and gripped them all up next to each other to create a pattern going along the front of the hair line. 


This is a view of what the front of the hair design looked like. You can see each side where the curls are all gripped up to the head. If I went further with my design I could of added pearls or jewels to the inside of the curls going along the front of the hair. Jewels and pearls were very popular in the hair with the upper class genre in the Elizabethan era. 


Here you can see the underneath and side of where I used the technique of the geisha pin in a figure of eight. I think these distinctive curls came out very well and I was very pleased with them. When taking the pins out, all you need to do it take the bottom grip out and them slide the geisha pin out and it comes out like this. You can separate the curls to make a few more or even brush it out however then it goes very frizzy. I preferred to keep them like this as I think it looks neater and compliments the overall hair design better. I was going for an upper class Elizabethan hairstyle which contains a few elaborate techniques in the hair. I didn't want the hair completely up so I left two strands at the back so they can hang forward and two by the ear. I think this gives the design pattern and a variety of lengths to the hair instead of being completely up. I think this design could be used for someone who was un-married as it is partly down which show freedom however it could be for a married woman as the hair is mostly up and they're being dynamic with there choice of hairstyle. 


Overall I'm very pleased with my hair design and think it came out very well I think I did each section and technique with time and care however I think I need to become a little more quicker which I will learn to eventually when doing the hair. My timing to complete this hair design was around two and a half hours, I would like to get it down to at least one and a half hours with my time management. If I could I would of included a rats to the hair, this is another technique which is basically just padding to the hair to give it a solid height. I think this would of made it easier to get the height of the beehive, however next time I can incorporate this into my hair design. However, overall I think the design came out very well and neat and definitely has an Elizabethan element to the overall hairstyle. 


Thursday 23 October 2014

Elizabethan/Tudor inspired Catwalks

Chanel Pre-Fall 2013 collection:


Hair Royal Highness at Chanel


The scene was a Chanel homecoming of sorts, a show that dramatized Coco Chanel’s lifelong romance with tweed, tartan, and cashmere, played out in the courtyard of Linlithgow Palace, birthplace of Mary Queen of Scots. “I like the emotion of it,” said Karl Lagerfeld. “This is about the queen of fashion and the Queen of Scotland—who was also French, you know.”


The interweaving of the threads of a double history—gutsy, outdoorsy, layered casualness played off against high Elizabethan-accented ruffled necklines, doublet corsets, and ballooning sleeves—gave the “Paris-Édimbourg” collection a multidimensional groundedness and authenticity.Visual resonances with the rich Celtic heritage of Scotland were carried through to the casting of red-headed models, their hair piled into pompadours by Sam McKnight (another Scot), who left tendrilly curls to frame pale complexions and pearl-drop earrings. “Karl sent me all these pictures of Elizabethan portraits of royalty.

I think Chanels Pre-Fall 2013 catwalk had major influences of the Elizabethan era. Sam McKnight was the hair stylist for the 2013 catwalk and included many aspects of the era within the hair styles. Red head models, pale skin, frizzy hair, egg beehives it just shouts the 16th century all over. I think bringing royal history into the Chanel collection is a unique idea idea as not many people bring back eras that far back. McKnight's hair techniques and contemporary twist to the styles is very original as he makes it look high fashion and elegant. 


 McKnight added plaits up the back of the hair, serious height and jewels, including baroque headdresses, tartan thistle, camellia corsages and opulent pheasant feathers, to the models hair - but in fact left behind an overall cool-rock, rather than regal, effect.


http://www.style.com/fashion-shows/pre-fall-2013/chanel/collection#timeline
http://www.vogue.com/fashion-week/862416/chanel-pre-fall-2013/ - article written by Sarah Mower
http://fashion.telegraph.co.uk/beauty/news-features/TMG9723421/Hair-Royal-Highness-at-Chanel.html - article written by Katy Young

Tuesday 21 October 2014

Hairstyles Used in the Elizabethan Times

Elizabethan Hair Styles for the court were led by Queen Elizabeth. Upper class fashion, which included hairstyles, was highly elaborate - and necessary to achieve attention and success at court. It was referred to as the Peacock age as the Upper class Elizabethan men were often more elaborately dressed than the women and their hair and beards received a similar amount of attention.

Elizabethan Hair Styles for women were designed to compliment the upper class fashions of the day. Ruffs, or ruffles, were in high fashion and during the Elizabethan era. The ruffs, or collars, framed the face and dictated the hairstyles of the age which were generally short for men ( at the beginning of the Elizabethan era) and swept up look was required for women. Early in the period also, hair was parted in the center and fluffed over the temples; later front hair was curled and puffed high over the forehead. Wigs and false hairpieces were used to extend the hair. The frizzy hairstyle was very popular for Elizabethan women at the end of the 1500's. Women kept their hair long and the full natural beauty of their long hair was displayed by the young women of the era. The long flowing hair of a girl was a sign of a virgin and the favoured hairstyle for a bride on her wedding day before she was wed off. Once a woman achieved the married status she wore her hair swept up. Much of the hair was covered by some form of head covering. Long hair was generally dressed in a bun to which the variety of head coverings could be pinned. The front and sides of the hair received great attention as this was the area that was most displayed. Hats and jewels were often a popular accessory to the hair and was mostly worn by upper class men and women however lower class men and women would also wear hats.

Fringes were not in fashion - hairstyle fashion dictated that hair was combed way from the forehead. The hairstyle was usually designed to compliment the style of the hat. Frizzed hair was favoured by the Queen and therefore followed by ladies of the court although straight hair was favoured with a centre parting which especially complimented the French hood.


On the left is a typical hairstyle of the period, front hair is curled and back hair is worn long, twisted and wound with ribbons and then coiled and pinned up. 


This portrait is of Catherine de' Medici in a widow's black hood and veil, after 1559.


While researching hairstyles on the internet I found a great link that provides you with different techniques and hairstyles from the Elizabethan Era. It provides you with information about what products to use and step by step guides of how to create the style. It’s said to be intended as a practical lesson in how to recreate the look of upper-class hair fashions of late 16th-century England. The first half of the class was a slideshow of period images, and in the second part, she styled her own hair and a wig, plus discussed tools.
^
http://trystancraft.com/costume/2011/07/15/elizabethan-hairstyles-1560-1600/


Information sourced:
http://www.elizabethan-era.org.uk/elizabethan-hair-styles.htm
http://www.elizabethancostume.net/headwear/coif.html


Monday 20 October 2014

Elizabethan Hair Style Influences in magazines

While looking for hair and make up inspiration for our project the New Elizabethan I was reading through the magazine Glamour November 2014 Issue when I saw a 2 page spread on plaits. The first page states a braid day and give 3 examples of different the plaits. The first style on the top left is Georgia May Jagger who pulls off the ever so lovely Low 'n' Long style. This style is parted right in the middle and the plait hangs low which was a very popular sleek style in the early 1500's. The second style is on Kate Bosworth  which is a large French plait coming across the forehead with the rest of the hair pinned back. The use of the plait has influences of the Elizabethan era however could represent more of a contemporary style or a different interpretation. The third photo is of Joan Smalls and is a side fishtail plait. This plait is quite easy to do however looks very complicated and can be used in a messy version which still looks very different and glamorous.

On the next page on the top left is Amber Heard and she has her hair completely curled on a side parting. Down the side of her hair opposite the fringe she has a French plait coming down the side of her ear and then hanging down. This style is very contemporary and could influence my future Elizabethan hair designs. I could incorporate different techniques and plaits into the hair with future contemporary Elizabethan designs.  On the top right is Eva Longoria and she has her hair in a high slick pony tail with the tail plaited down. On the bottom left is Emma Stone who has her hair in loose waves with a low braided fringe coming across. Emma Stone is a good alikeness to Queen Elizabeth as she has naturally golden red hair and pale skin, which suits the complexion of a natural beauty in the Elizabethan Era. On the bottom right is Alexa Chung who wears her parted down the middle with two small plaits on each side of the hair. I could incorporate aspects of this design into something I could create myself something different. If I created a design I could use inspiration from Alexa Chungs hair design. I could part the top half from the bottom and have a plait on each side of the head on the bottom half. And with the top half I could crimp the top half and create a egg shaped beehive with this I could then attach jewels to the top of the hair and maybe pearls down the plait itself.

Elizabethan book research


Book 1- 'Fashion in Hair the first five thousand years'

The Sixteenth century- Pages 159-197

I studied the pages of 171-172 and 197 in the book:
Pages 171-172 spoke about the mid years of the 1500's. The book briefly speaks about Queen Elizabeth and her influence in the era however it mainly describes the ongoing hairstyles throughout the century, what was in fashion and what class wore what hair style. This book as its based solely on hair only speaks about the different hair styles, what hair colours were in fashion, what hair techniques they used and compares English hair styles to what other countries wore also. This book has 38 pages based on the hair styles and fashion of the 16th century. This includes a variety of classes and men and women styles throughout the century. Each century in this book is in order and speaks in the next one if the style was carried through to the next century

I found this book very helpful in detail on the 16th century as a whole. It speaks about Queen Elizabeth but mainly talks about what hair styles were in and what men and women would wear. I feel this book gave me knowledge on the range of hair styles including the different classes of the era and also the different hair styles which were popular in other countries. I think the hair information from this book and the styles, fashion, influences and make up in the first book really helps me get an overall idea of what they would look like in the Elizabethan era. I can take this research forward and use it to help me get an understanding of the Elizabethan look and create my own designs based on the era. 


This is page 197 and it contains drawings of different types of hair styles and who they were worn by.

- Sixteenth-century women 1550-1600

A- Queen Elizabeth 1 (earlier hair style)
B- 1560's style
C- Mid-century 
D-German Peasant 
E- German Peasant 
F- Probably French 
G-German style
H- German peasant
I- Mid-century, Italian style
J-Italian. Duchess Renata of Ferrara 
K- Mid-century, probably French
L- 1560's style
M- Queen Elizabeth 1 (later period hair style)
N- 1579, French. Hair dressed over pads or a wire frame
O- English. Hair dressed over pads
P- German. Hair dressed over pads
Q- 1570's style
R- 1597, Italian. Hair dressed over wire frame
S- 1597, Italian This was also worn with a cone-shaped head-dress
T- 1597, Italian. Horns of hair dressed over a wire frame
U- 1597, Italian. The same treatment of the front hair was also used without the cone shaped arranged at the back. 


The description of the hair styles from the sketches which was labelled with letters and both photos, all this information was sourced from the book 'Fashion in hair the first five thousand years'. A variety of theses sketches are presented throughout the book which really gives you an idea of what the styles looked like through drawings. I found this book very helpful with information based on the 16th century. 


Book 2- "Costume and fashion 1550-1760"


This book speaks widely of the fashion in the 16th, 17th and 18th century. It goes through each detail of the wardrobe of what men and women would wear in each century. Womens fashion in the 16th century is on pages 26-34, I briefly read through the pages and tried to find the section where they speak about the hair fashion, what they would do with the hair and if they wore any head gear. The fundamental innovation for women in this period was also the uncovering of the hair. This may of not be so new in other countries but in such such as France and Britain it was a big step and as
the Italians and Germans already had there hair uncovered and often wore long swinging plaits. In the middle ages every woman who was married or past her youth covered her hair. By 1550 an English lady would still cover her head with a cap, over which fashion placed a French hood.

Court ladies, especially young ones, sometimes went bare-headed, although they usually had a token piece of lace or jewel in the hair. Thus, for the first time, we see hair styles. At first hair was parted in the centre, combed softly back and tucked out of the way in a flat bun behind. For a time it continued to be combed, flat, off the forehead but in the 1560's began to be puffed up and over the brow; soon it was dressed over a wire frame to get the desired hight. The raquette or heart-shaped style was a popular one, in the 1580's it was popular to be curled to the crown and built up higher. By the end of the century it was frizzed and built up in an egg shape. False hair was sometimes used to get the proper effect , as well as wire and padding.

Overall I found this book very informative about the 16th century fashion and hair styles. It talks its way through each decade and how the hair fashion slowly changes through time. It starts with being very covered and then changes to middle parted and straight, then when it hits the the 1580's the hair starts getting larger using padded and wig and the technique of the hair is fashionable to be frizzed or curled. I think this book explained in great detail the styles throughout the era. This information can help me create Elizabethan hair styles further into my unit and I can use this and bring forward these styles to contribute to my own designs.


Thursday 16 October 2014

Beyonce- Mrs Carter Show


Elizabethan Elements:


In 2013 Beyonce did a world tour featured as the Mrs Carter Show. Beyonce has created many videos, adverts and backing videos for her world wide tour. The first video which was from YouTube was a backdrop video, this is the video that plays before she comes on the stage and during her performance. This videos theme is clearly all white, and the style of clothes and hair I think can slightly relate to Elizabethans or Queen Elizabeth herself. Our brief title is the New Elizabethan which when we create our final look or through development we can bring our own modern interpretation of the Elizabethan era. In this video Beyonce and her back up dancers are all in white, the men are all wearing 'ruffs' around there neck which is a item of clothing they wore in the era. For Beyonce herself she has her face and body painted white and has defined red lips these was seen as high beauty in the elizabethan era, the whiter your skin was the more pure and beauiful you were, this was complimented with red lips and cheeks. Another Elizabethan influence is the hair, she has wavy large hair which is put up into a beehive, this volume and technique was used a lot in the elizabethan times. At the end of the clip a man places a large piece of jewellery on Beyonces head; props, jewels, pearl and other accessories were very popular to wear in the hair during the Elizabethan times. The amount and type of jewels showed wealth and class in women.


This second video of Beyonce is the advertisement for the Mrs Carter Show world tour for O2. This video is very similar to the first clip however she's not completely in white this time. The clothing such as the corset is very 16th/17th century because the women would wear them under there clothing to bring there waists in. When Beyonce walks into the room the camera turns and face the walk which shows a portrait painting of beyonce which is in a very similar style to Queen Elizabeths 1 with the use of colour, clothing and stance. She is portrayed as the Queen. Another important Elizabethan influence is the hair again, Beyonce hair is curled in tight ringlets which were in fashion in the 16th century. She has part of it clipped up into again a beehive which is topped with a crown on a slant with a few strands loose strands of curls at the front of the hair similar to one of Elizabeths hairstyles. In the extended version of the video clip they spoke about how the point of the video was not to get the history spot on but it was to get there own interpretation of what they thought it would look like.


Elizabeth 1 movie 1998- Hair reference


Elizabeth (8/11) Movie CLIP - I Am No Man's Elizabeth (1998) HD

In this part of the film, Queen Elizabeth 1 (played by Cate Blanchett) has a very elaborate hairstyle. The top part is up in tight ringlet curls to the head topped with a crown and hanging jewels. As for the bottom part of her hair she has loose waves that look like a zig zag shape. The 1998 film recreates Elizabethan hair styles that represent the era they were in. The technique and style works very well and each woman in the film has a unique Elizabethan hairstyle. Elizabeth 1 movie is a great reference to gather hair inspiration and ideas as they portray the era very accurate and have a variety of men and womens hair styles. I particularly like this hair design because I like how its partly up and looks sophisticated however its also partly down which shows her innocence and that she's unmarried and pure. The detail and technique in this design is very good and works very well on Queen Elizabeth as it shows her wealth through the hair design.

Frizzing the Hair

One very popular and well know technique for the Elizabethan era is frizzing, another way to look at is waves/crinkles in the hair. Its slightly different than a normal curl which is normally done with hot
curling tongs as this curl we want it to look more crinkled or a zig-zagged pattern down the hair. On the right is a portrait of Mary Queen of Scots, part of her hair is clipped up into a small beehive which was probably padded out, and the bottom strands are loose. The top of the hair has a crinkled/wavy look to it however has been put up with jewels and accessories. The style of the loose parts of the hair is slightly different than a tradition curl/ringlet. In our recent lecture we were shown a demonstration of how to create this particular look.


Our teacher started with showing us all a demonstration of how to create the waves that are loose on Mary Queen of Scots, Queen Elizabeth and probably many other Elizabethans during that time. Start with getting a small section of hair, and with a geisha pin put the root of the hair inside the pin. You then need to start wrapping the hair round the pin in a figure of eight. Once all the hair is wrapped around, you need to take the end strand and wrap the end piece round the pin and then use a normal wavy grip to secure the ends.


Once the ends are secure you can then use your straighteners and press them down onto the hair to heat up the wound hair. Make sure all the hair has been flattened by the straighteners, you only need to hold them in the straighteners for around 5 seconds and it should hold into place.
 Once you've done a few, the firsts ones you created should of cooled down by now. All you need to do is take to wavy grip off the end and pull the geisha pin out and your section of hair should come out looking like this. You can then style it how you want, either separate the curl or brush it out to make a frizzy curl.


Here I started trying the technique out myself. In the first photo is what the hair looks like wrapped around the pin. You can use more hair in one section than the other however when there more hair its harder to fit in and wrap around the hair. The second photo is what the hair looks like when I pulled the grips and pins out, this create a defined wave. The middle photo is when I separated the curls and the volume increased and there were more small curls and it was slightly frizzy. The next photo is what the hair looks like when it has been brushed out. It give a lot of fluffy volume and is very frizzy, this works well because you can really work with the hair and play around with it and it creates a lot of height and volume. I think this technique would work really well with the Elizabethan era hairstyles as its gives that defined wave and frizz that the Elizabethans had.


Wednesday 15 October 2014

Experimenting with Contemporary Hairstyles

In our hair lesson we looked through a variety of photos from the 1500-1600's era and what sort of technique and accessories they used in the hair. We then looked into contemporary hairstyles that is used today in everyday life and also fashion show and photo shoots . Many hairstyles today contain elements of the Elizabethan era fashion and incorporate it into there hair. During our lesson we were working on our Kate Heads and was experimenting from different photos we liked to create a contemporary hairstyle. We then could add an accessories if we wanted such as beads, ribbon, bows, etc...

My design-


This is my hair design that I created. I started with parting a strip of hair around the head and and clipping the middle bit up to keep it out of the way. I then created a centre parting, and on one side I tied a red ribbon around the root of the hair and created a bow and then started to French plait down the side of the section including the ribbon.

Once I reached the bottom in the middle of the hair I stopped and then back combed the end to keep the plait in place. I Then took the ribbon from the top and the tied the other half to the other side of the root of the hair and then starting French plaiting down the other side incorporating the ribbon again. Once that plait was down to the bottom I back combed the end to keep the plait in place also.
At the bottom of each plait I then crossed them over and brought them back up each side of the head and gripped them into place while hiding the grips. I then pulled the left over red ribbon back down and clipped it into the hair. For the middle part, I sectioned the hair into four parts, back combed each part and gripped into place. I left the top section for last because then with this part I can back comb it to receive volume at the top and then pull it over the whole section to even it out and made sure all the grips are hidden under the hair.

Overall I'm very pleased with the outcome of my first contemporary Elizabethan hairstyle. I feel to start with I wasn't sure about the design and it coming together well, however when I got into it more the design started coming together really well and started looking like a hairstyle. I think I could work on a few things such as my French plaits, I felt they could of been a bit neater. Also I would try and incorporate the ribbon into the hair in a different way and explore ideas of using props and accessories in the hair.